
 Facebook
 Instagram
 X (Twitter)
 TikTok
 Pinterest
 YouTube
 LinkedIn
 Threads
 Google Business Profile
 Telegram
 Discord
How to Photograph Clothing Without a Model or a Photoshoot
A clothing brand needs two pictures of every piece it sells. One is the garment on its own, straight on, plain background, true colour, the thing a buyer zooms into on the product page. The other is that same garment on a body. The first one you already have, because the product page needs it. The second one is the whole job.
Most small brands assume the second picture means hiring a model, booking a studio and paying a day rate, so they shoot twice a year and go quiet in between. It does not have to work that way. This guide covers the routes to a good clothing photo when there is no model in the room, what separates a believable on-model shot from an obvious fake, and where the line is on AI-generated models.
It is the practical half of our wider guide to marketing a clothing brand on social media, which covers channels, formats and a weekly plan. Yoomru, the app we make, appears near the end where it is relevant, and we say so plainly.
Why the shot with a body in it outsells the flat one
A flat photo answers one question: what is the garment. Everything else a buyer wants to know is about a body, and a rectangle of fabric on a white background cannot answer any of it.
- Where does it sit? The hem, the sleeve, the waist. "Length 96 cm" is a number. A photo of it on a person is an answer.
- How does the fabric behave? Cling, drape, structure and weight are invisible flat and obvious worn.
- What does it go with? Nobody buys a garment in the abstract. They buy the outfit they can picture.
- Is it for someone like me? The most persuasive thing in apparel is a body that looks like the buyer's, at a height and size they can compare with their own.
Merchants who sell without any of this say the same thing about what happens next: product-only images come back as returns, because a buyer who could not judge fit before ordering judges it in their hallway instead. Every one of those costs you the shipping twice and often the item.
That does not mean spending your way out. One of the most useful stories in this whole subject is from a brand that replaced its phone-and-white-wall setup with a five-figure professional shoot and watched conversion fall, because the models were too polished to be relatable, the lighting flattered the fabric into looking like something it was not, and the returns went up rather than down. Polished and trustworthy are not the same thing, and in apparel the second one sells.
Start with the flat photo, and get it right
Whatever else you do, keep shooting the garment on its own. It is your main product image, and it is the raw material every route below needs. Two things make it good enough to build on: an even, plain background, and a colour that matches the garment in daylight.
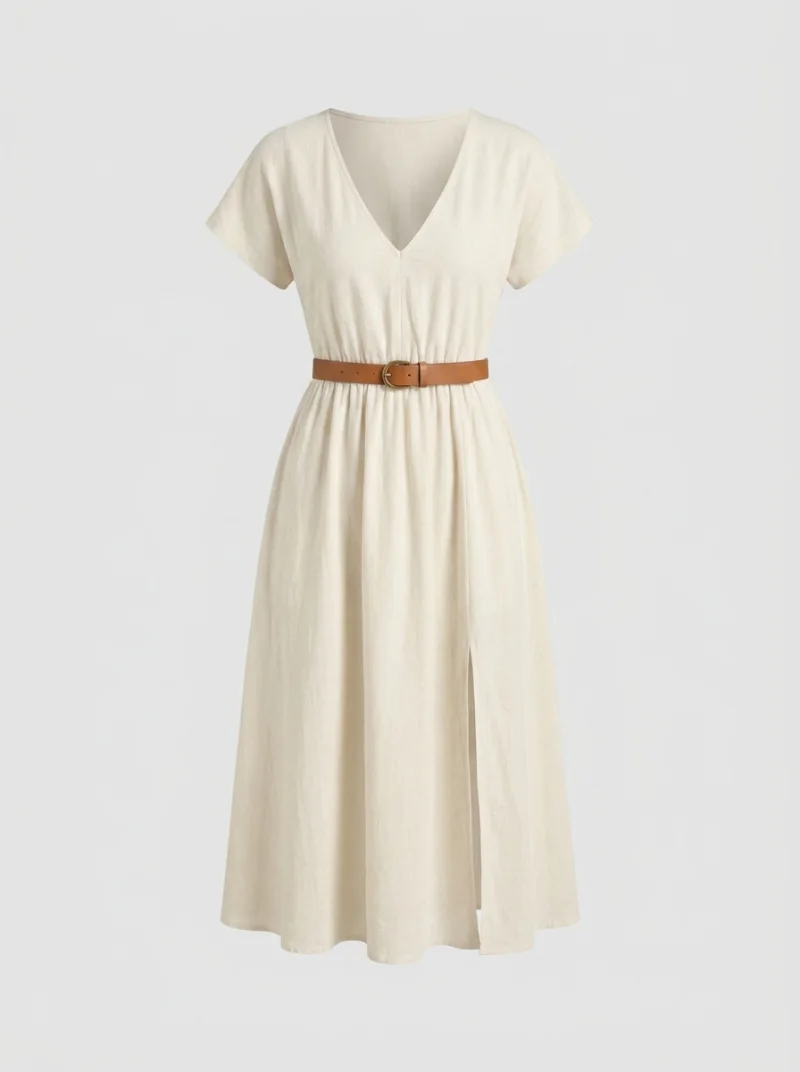
That is a ghost mannequin shot, also called an invisible mannequin: the garment photographed on a form, with the form edited out, so it holds a body's shape without a person in it. It is the single most useful product photo a clothing brand can own, and it is also the best possible input for the generated route below.
How to photograph clothes without a mannequin
Not everyone has a dress form, and the alternatives are where most small brands get stuck. The honest ranking, best first:
- Borrow the shape. A cheap dress form, or even a foam torso, pays for itself in one collection. It is the least glamorous money a small brand ever spends well.
- Stuff it. Tissue paper or a folded towel inside the body and the sleeves, shot from straight on. It is fiddly and it works, and the giveaway is always the shoulders, so build those up first.
- Hang it properly. A slim wooden or metal hanger against a plain wall, with the hanger hook edited out afterwards, is the "invisible hanger" look. Steam the piece first; a wrinkle reads as cheap faster than anything else in the frame.
- Flat lay. Pressed, laid square to the camera, shot from directly above with the camera parallel to the surface. Good for tees, knitwear and anything with a print. Poor for anything whose whole point is how it hangs.
- The folded stack. Fine for a colourway grid or a social post. Not a substitute for a product image.
Whichever you use, the discipline is the same: steam it, square it up, shoot straight on, keep the background plain, and get the colour right before anything else. Ecru, olive, navy and black are where screens lie, and where returns come from. Correct against the physical garment rather than against your memory of it, and stop.
The three routes to a photo with a body in it
There are only three. Brands that take this seriously end up using all three for different jobs.
1. Photograph a real person
The cheapest and most honest route, and the one most brands skip because it sounds like the expensive one. You need one person, one wall or one doorway, and daylight. Not a model: a friend, a colleague, a customer, yourself.
- Pick the spot for its light, not its looks. A plain wall with soft indirect daylight for two hours a day beats a beautiful location in a dark corner.
- Shoot from chest height, straight on, from far enough back that the lens does not stretch the nearest limb. Standing close and pointing down is what makes a snapshot look like a snapshot.
- Get full length and half length in the same session, plus one detail shot of the fabric.
- Ask for a little movement. A step, a turn, a sleeve pushed up. Fabric in motion is the whole point.
- Do not pin or clip anything. Studios do it and shoppers have worked it out; a garment pinned tight at the back is a fit complaint waiting to be filed.
- Write down the height and the size, and put both in the caption. This is the part that does the selling.
Do this once and the person becomes a signature. A brand whose clothes always appear on the same two people in the same afternoon light is recognisable in a way one cycling through stock models never is. The limit is obvious: you cannot photograph every colourway in every size this way, and people have other things to do.
2. Hire a model and a studio
The best images you will get, and the right call for a lookbook, a launch or your five or six hero pieces. It is also why most small brands have twelve good photos and then nothing for eight months. Rates vary wildly, but merchants comparing notes tend to land in the tens per product for flat lay and mannequin work and in the hundreds per product once a model is involved, which is exactly why a fifty-piece drop never gets shot properly.
The workable compromise, and the one experienced brands describe, is to spend the shoot budget on the handful of pieces that carry the brand and cover the long tail another way.
3. Generate the shot
The third route is a photographed person and a garment try-on model that puts your piece on them. The output looks like a photograph because the scene was one. The garment is yours, taken from the flat or ghost-mannequin file.
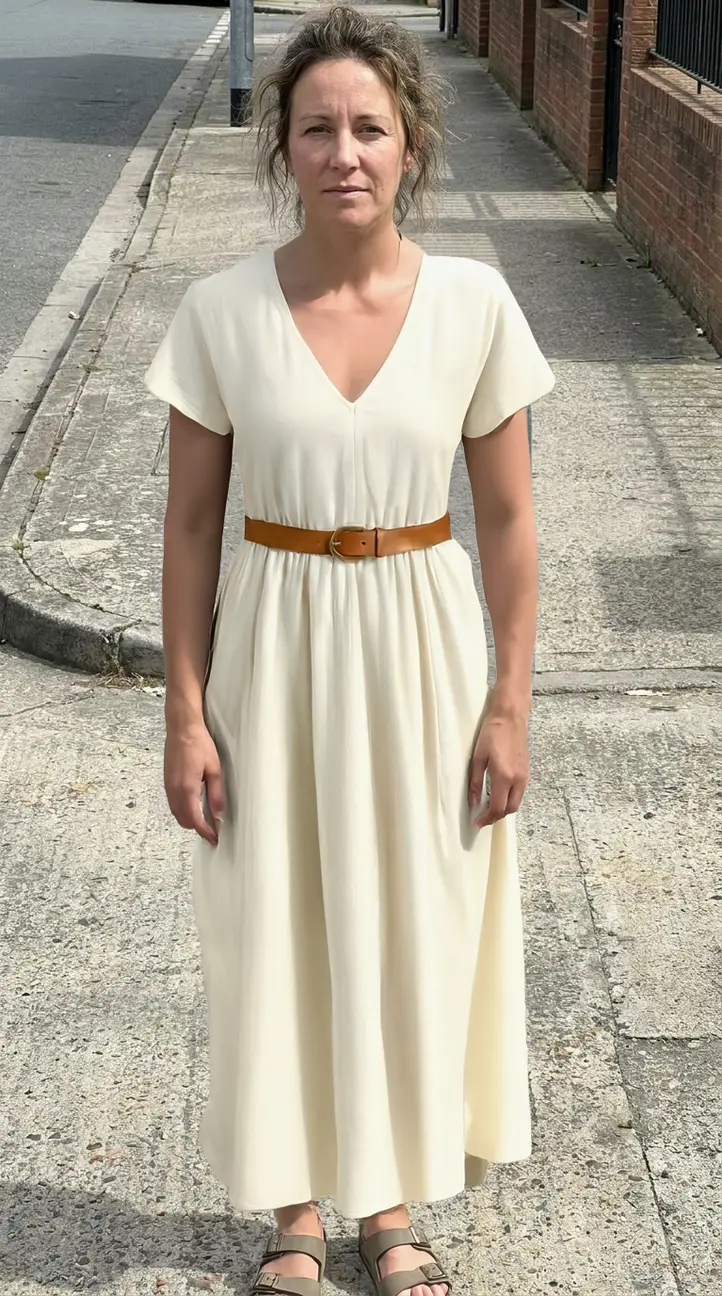
Here is the dress above, on a person, in open daylight:
And the same garment, same source file, at the end of the day on a set of stone steps:
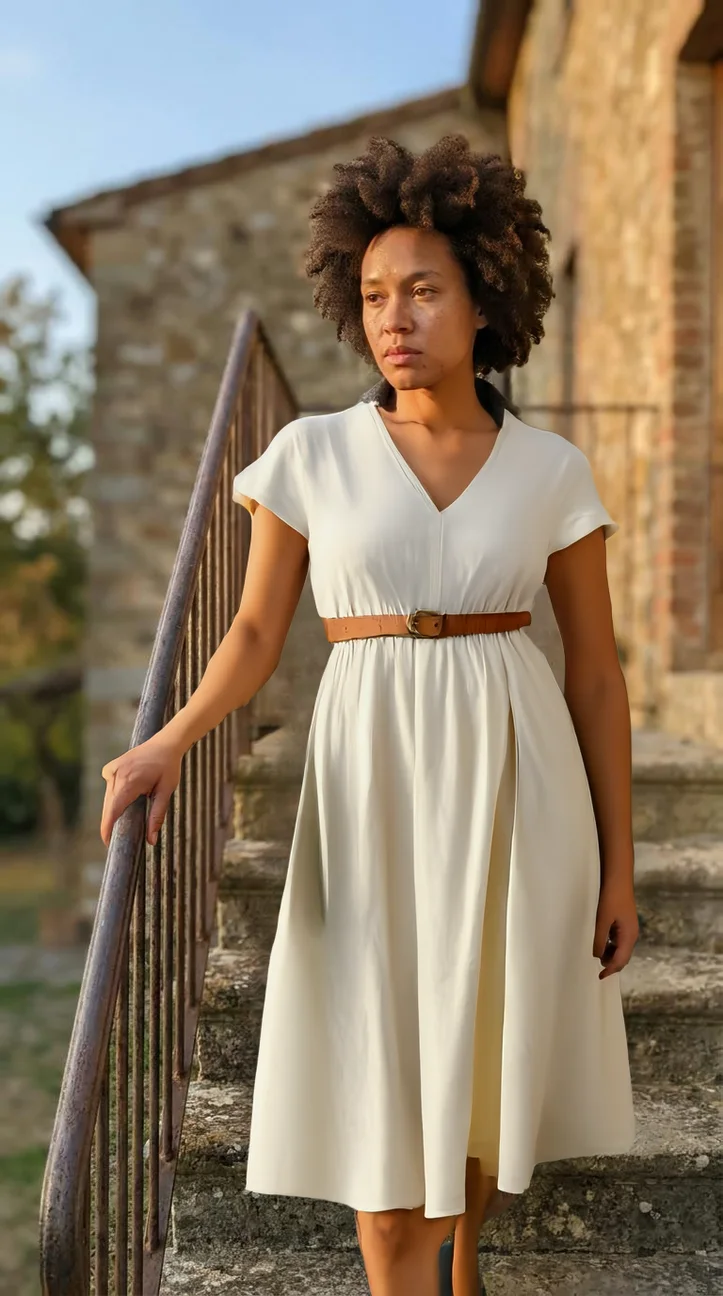
Both are AI generated, both are labelled as such here, and both had to be checked before they were used. That check is the whole discipline of this route.
Worth knowing before you start: try-on models are strongest on upper-body garments, weaker on full-length pieces and layers, and poor at changing what kind of garment something is. Sending a dress to a scene built around a t-shirt tends to produce something that is neither. And the fabrics where the illusion breaks first are the ones with the most to hide: knitwear, anything sheer, anything with a complex weave.
What to check on every generated shot
Here is the printed tee from the pillar guide, generated onto a bedroom mirror scene:
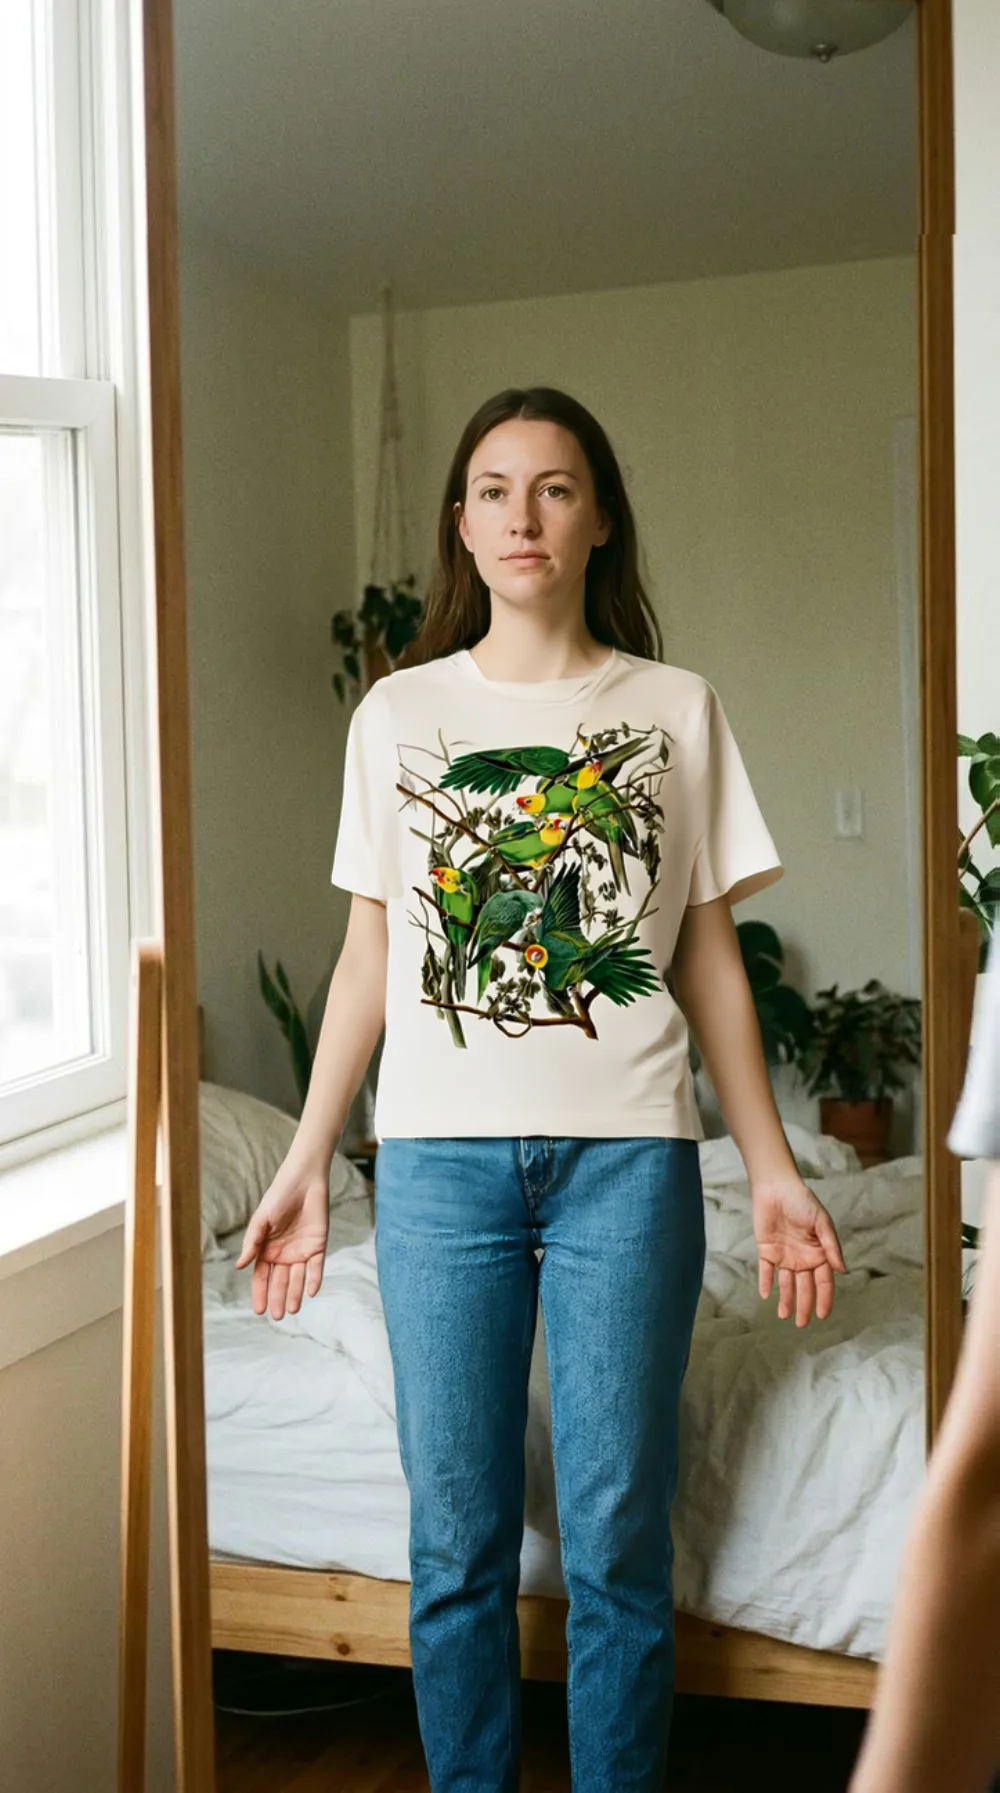
This one is worth using, and the two reasons why are the two things to measure on every shot. The hem sits at the waist, where a boxy tee sits. The print covers about a third of the chest, which is where it sits on the flat lay. Those are the measurements that drift, and when they drift the picture is advertising a garment you do not sell.
No tool will tell you when that happens. The only defence is looking, at full size, at every image, before it goes anywhere near a buyer:
- The silhouette. A boxy tee should still be boxy, a cropped piece still cropped. A hem that has drifted describes a garment you do not sell.
- The print, at the right size. Graphics and placement prints drift most: a chest print quietly becomes a front print. Compare it against the flat lay, not against the last generated image.
- The colour. Hold the shot next to your product photo. Warm light in a scene pulls an ecru towards cream and an olive towards khaki.
- The details that carry the price. Buttons, belt, hardware, pocket placement, collar shape.
- Hands, hems and edges. The area around the garment gets repainted along with it, so look at what is next to the change as carefully as the change itself.
- The input you sent. A photo of someone already wearing the garment gives you two outfits at once. Send the flat lay or the ghost-mannequin shot.
- Whether it is always the same body. If every image on your site is one figure, you have quietly told half your customers the clothes are not for them.
And the rule that sits above all of them: the image must not oversell the fit. A relaxed shirt rendered as fitted, or a midi rendered as a maxi, is a return and a bad review whatever any platform rule says about AI.
Can I use AI models for my clothing brand?
Yes, in most places, with conditions that are worth knowing properly rather than guessing at. Three separate things get confused here: what the platforms require, what the law requires, and what your customers will forgive.
The platforms. TikTok is the strict one: content that uses AI to show realistic-looking people or scenes must be labelled, and unlabelled content can be removed, restricted or labelled for you. There is a separate switch for content that promotes a product or a brand, and merchants routinely miss it. Meta is looser for ordinary product imagery: it applies an "AI info" label of its own when it detects the provenance data generators embed in a file, and its explicit disclosure requirements are aimed at political advertising and at manipulated media on matters of public importance, not at a jumper. Shopify has no policy on AI imagery at all; anyone quoting one is inventing it.
The one hard technical rule most merchants miss comes from Google. If your products go into Google Shopping, images created with generative AI must carry the IPTC DigitalSourceType metadata tag marking them as such, and you must not strip embedded metadata tags. It is a metadata requirement rather than a visible label, and the realistic way to fail it is an image pipeline that quietly discards metadata on the way into your feed.
The law. Three points, none of which is "you must write AI on it":
- An image must not mislead about the product. That rule predates AI and applies whatever made the picture. The UK's advertising regulator has been unusually clear that there is no blanket requirement to disclose AI, and equally clear that a disclosure does not rescue a fundamentally misleading message. You cannot mislead about a fit and then disclaim it in the small print.
- Prominence matters. A high-profile fashion campaign was criticised not for using an AI model but for a disclosure so small that nobody reading the page would see it. If you label, label where it will be read.
- The moment she speaks, it changes category. In the United States, a rule on consumer reviews and testimonials makes it illegal to misrepresent that a reviewer exists or that they used the product. An AI model silently wearing your dress is not a testimonial. Put "I love how this fits" in her mouth and you have created a testimonial from a person who does not exist and never wore it, which is a straight violation. Never write a generated person a first-person endorsement.
In the European Union, transparency obligations for AI-generated content that convincingly resembles real people have recently come into application, and they treat a sole trader who benefits commercially on a regular basis as a deployer with duties of their own. The prudent reading, until practice settles, is that a photoreal AI model in a commercial context needs a human-visible label, not just metadata buried in the file.
What customers think. When shoppers spot AI models on a fashion site, the objection is rarely "this is fake". It is "this defeats the purpose": they came to see how the garment behaves on a body, and a generated body cannot tell them. The version they say they would accept is a real photo on a real person first, with generated images clearly presented as an extra showing the same piece on other heights and shapes.
Which is the workable pattern, and the one some large brands now use openly. Not "AI instead of photography": photograph the real garments, use those photographs as the input, generate the breadth, and keep a real shoot for the pieces that carry the brand.
Building a small reusable set
You do not need fifty scenes. You need four to six that each do a different job, and then you run every new piece through them.
| Scene | Job it does | Best for |
|---|---|---|
| Plain wall, full length | The honest reference shot: length, fit, proportion | Everything |
| Half length, half turn | Neckline, shoulder, sleeve, how it sits at the front | Tops, shirts, knitwear |
| Walking or turning | Drape and movement, the thing a still cannot show | Dresses, skirts, outerwear |
| Seated or leaning | What happens when a body is not standing straight | Trousers, denim, tailoring |
| Detail crop | Weave, stitching, buttons, the care label | Anything with a price to justify |
Reuse the same scenes rather than chasing new ones, because repetition is what turns a scene into a house style. Cut every crop at once, since a 9:16, a 4:5 and a 2:3 out of one shot fill three slots for no extra work. And keep at least one photograph of a real person in the set, as the anchor everything else is judged against.
Where Yoomru fits
Full disclosure: Yoomru is our app. It is a Shopify app that posts your products to social media and generates the media to post, and one of the things it generates is a shot with a body in it.
There are six clothing scenes: a mirror selfie, a street walk and a café table for tops and tees, and a turn in daylight, a doorway pose and evening stairs for dresses and outerwear. You pick a product, and a garment try-on model puts your piece on the person in the scene. Every generated image in this post came out of that pipeline, including the one we rejected.
The app asks for the right input rather than hoping for it. Each scene says what kind of photo it needs, right under its name, and for clothing that is a flat lay or a ghost-mannequin shot on a plain background:
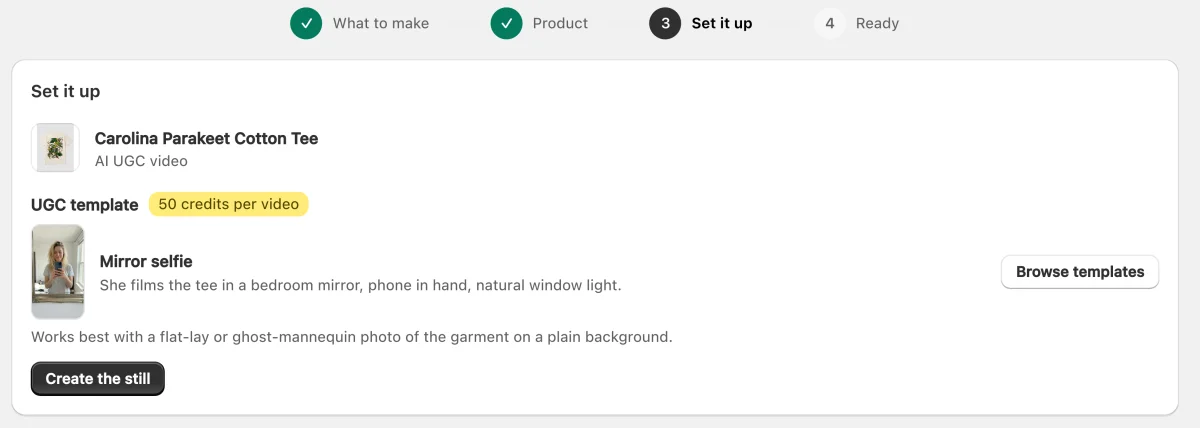
Each scene makes either a still or a five second clip. The still costs 15 AI credits, the clip 50, out of a monthly allowance that also pays for AI captions at one credit each: 50 on Free, 250 on Starter, 700 on Growth, 1,500 on Pro. In the composer a clip runs in two steps on purpose. The still is made first, so you can look at it and decide whether your garment survived, and only then does it get animated. Retrying the still costs nothing extra. Posts carrying an AI clip get a "Created with AI" line added to the caption by default, which you can reword or switch off in Settings.
Four honest limits, since this post has spent so long on why generated photos go wrong:
- Six scenes is six scenes. They are ours, we authored them once, and every brand using the clothing categories gets the same people. That is the stock-model problem at a smaller scale, not the absence of it.
- It costs credits, so it suits new pieces and best sellers rather than a catalogue of a thousand SKUs.
- You still have to look at every image. The rejected shot above went through the same pipeline as the ones we kept, and nothing in the app flagged it.
- It cannot answer the fit question. A generated person is not a real body at a stated height in a stated size, and that is the thing apparel buyers actually want. Photograph a real person for that, at least once per piece.
The free plan publishes real posts rather than previews, and the feature documentation is at yoomru.com/documentations.
Before you publish a photo with a body in it
- The garment in the image matches the one you sell: silhouette, length, colour, print size, hardware.
- The fit shown is the fit that arrives, with nothing pinned, tucked or slimmed.
- The caption says the height and the size, if there is a real person in it.
- You looked at the edges: hands, hems, seams and whatever the model repainted around them.
- Anything generated is labelled, somewhere a reader will actually see it.
- Nothing generated has been given words to say.
- You cut the 9:16, the 4:5 and the 2:3 while you were there.
FAQ
How do you take pictures of clothes without a mannequin?
Stuff the garment with tissue and shoot it straight on, or hang it on a slim hanger against a plain wall and edit the hook out afterwards, or lay it flat and shoot from directly above. Steam it first and get the colour right; those two things matter more than which method you pick.
Can I sell clothes online without a model?
Yes, and plenty of brands do it on ghost-mannequin shots alone. It costs you conversion, because the fit question goes unanswered, so the usual compromise is ghost mannequin on the product page and a real person, at a stated height and size, in the content around it.
Do I have to say when a photo is AI generated?
On TikTok, yes: realistic AI-generated people and scenes have to be labelled there. Meta does not require it for ordinary product imagery, though it may add its own label if it detects the file's provenance data, and Google Shopping requires the AI metadata tag on generated product images. Beyond the platforms, the obligation is not about AI at all: an image must not misrepresent what arrives, and a label does not fix one that does.
Is a virtual try-on photo good enough for a product page?
For the main image, no. A product page should show the actual garment, which means the flat or ghost-mannequin photo, plus a real person if you have one. Generated shots belong in the content around the sale and in the second and third images, where they show a piece in a life rather than standing in for the truth.
What should I send a try-on model, exactly?
One garment, flat or on a ghost mannequin, straight on, plain background, well lit, cropped to the garment. Not a photo of someone wearing it, not a group shot, not a styled flat lay with three other things in the frame.
Where do these images go once I have them?
Instagram first, then Pinterest, then wherever else you are. The channel-by-channel version of that answer is in how to market a clothing brand on social media, and the format that eats the most of them has its own guide in Instagram Reels for clothing brands.