
 Facebook
 Instagram
 X (Twitter)
 TikTok
 Pinterest
 YouTube
 LinkedIn
 Threads
 Google Business Profile
 Telegram
 Discord
Jewelry Product Photography at Home: Photos and Videos With Just a Phone


Jewellery is the hardest thing in ecommerce to photograph, and it is not close. Everything that makes a piece worth buying works against the camera: it is small, so the lens has no depth of field to spend; it is polished, so it mirrors the room, your hands and the phone; and the part that carries the price is often a millimetre wide.
None of that is solved by a studio. It is solved by a window, a sheet of paper and a phone held still, plus one habit almost nobody has: showing the piece next to something a person can measure it against.
This is the practical half of our guide to social media marketing for jewelry businesses, which covers channels, formats and a weekly plan. Yoomru, the app we make, appears near the end where it is relevant, and we say so plainly.
What a jewelry photo has to do
A product photo of a ring has four jobs, and most shops only do the first one.
- Show what it is. Straight on, sharp, plain background, nothing else in the frame.
- Show how big it is. Against a hand, a fingertip, a coin, or worn. Research into ecommerce imagery keeps finding the same thing: a large share of shoppers judge size from the pictures, and a large share of sites give them nothing to judge against. People who cannot tell do not ask, they leave.
- Show the true colour. Yellow gold, rose gold and champagne finishes are where screens lie hardest, and where the disappointed unwrapping happens.
- Show the detail that justifies the price. The setting, the solder seam, the texture, the clasp, the stamp.
Four jobs, four photographs, and only the first one needs to be perfect.
The setup: a window, some paper, and something to lean on
Buy nothing until you have tried this, which is the setup most small jewellery brands settle on anyway.
- A north-facing window, on an overcast day. Soft, even, no colour cast. Direct sun makes a mirror of every polished surface and blows out the highlights that make gold look like gold.
- A sheet of white paper curved up the wall, so there is no line where the surface meets the background. A2 card covers anything smaller than a bangle.
- A second sheet on the shadow side, held up as a reflector. This is the single change that makes an amateur jewellery photo look deliberate: it fills the dark side of the metal without adding a second highlight.
- Something to rest the phone on, because jewellery is shot close and close means every shake shows. A stack of books works.
- Something invisible to hold the piece: museum putty, a pin through card, a thin wire behind it. Arrange chains with a cocktail stick, not fingers.
Two things to keep out of the frame: your reflection, and any colour near the piece. A red jumper turns silver pink from a metre away.
Phone settings that matter
Modern phones do most of this well if you stop them helping too much.
- Tap to lock focus and exposure on the part you want sharp, then leave it alone between shots so the whole set matches.
- Back off and crop in rather than pushing the lens as close as it goes: a phone at its minimum focus distance bends straight lines and turns a round band oval. Macro mode is for the detail shot.
- Turn portrait mode off for product shots. A fake blur has to guess where a chain ends, and it always guesses wrong.
- Shoot a little dark rather than a little bright. A blown-out highlight on gold has no detail left to recover.
- Correct colour against the piece in your hand, not your memory of it. Get one shot right, then apply that correction to the set.
Here is what you are aiming for. Nothing in the frame but the piece, the shape readable, the finish visible:
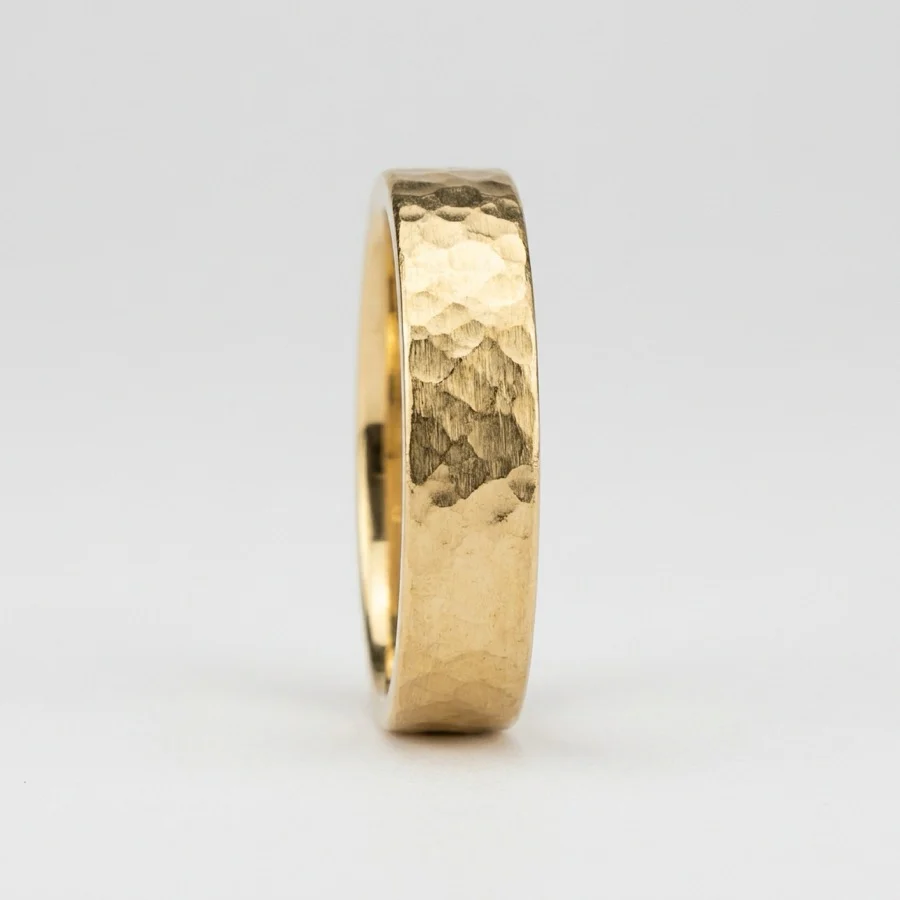
The shot most jewelry shops skip
That photo is good and it is not enough, because it does not say how big the ring is. A 6mm band and a 3mm band look identical on a white background, and the buyer who guesses wrong sends it back.
Three honest ways to answer it, a minute each: photograph the piece worn, in a hand between two fingers, or next to a known object, a coin being the classic. Worn is the best of the three, because it answers size, drape and colour-against-skin in one frame.
Do it once per piece and put it second in the product gallery, not tenth. Then say the measurement in the caption anyway. The picture makes it believable, the number makes it checkable.
Getting it onto a body
There are three routes to a worn shot, and most shops end up using all three.
1. Photograph a real person
The cheapest and most honest route, and the one most shops skip because it sounds like the expensive one. You need one person, one window, and a plain wall. Not a model: a friend, a colleague, yourself.
Shoot from the distance a person would be seen at rather than pressed against the skin, keep hands relaxed, and focus on the piece rather than the face. For rings, a slightly curled hand resting on something beats a flat starfish. Take a close one and a natural one: the close one sells the detail, the natural one sells the life.
2. Hire a model and a studio
The best images you will get, and the right call for a campaign or your five or six hero pieces. It is also why most small brands have a dozen good photos and then nothing for eight months. Spend the budget on the pieces that carry the brand and cover the long tail another way.
3. Generate the shot
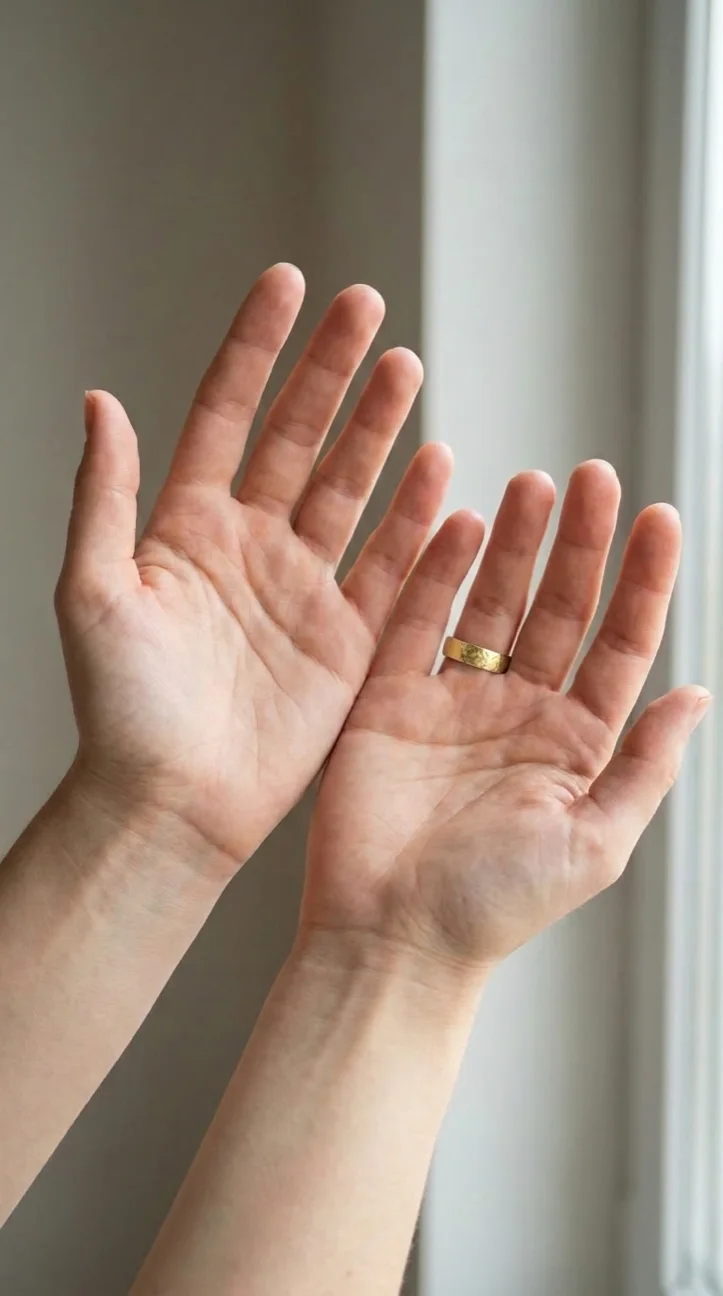
The third route is a photographed person and an image model that places your piece on them, working from the product photo you already have. The scene was a real photograph, which is why the result looks like one.
Here is the ring above, on a hand:
And a different piece, a pendant on a fine chain, at a neckline:
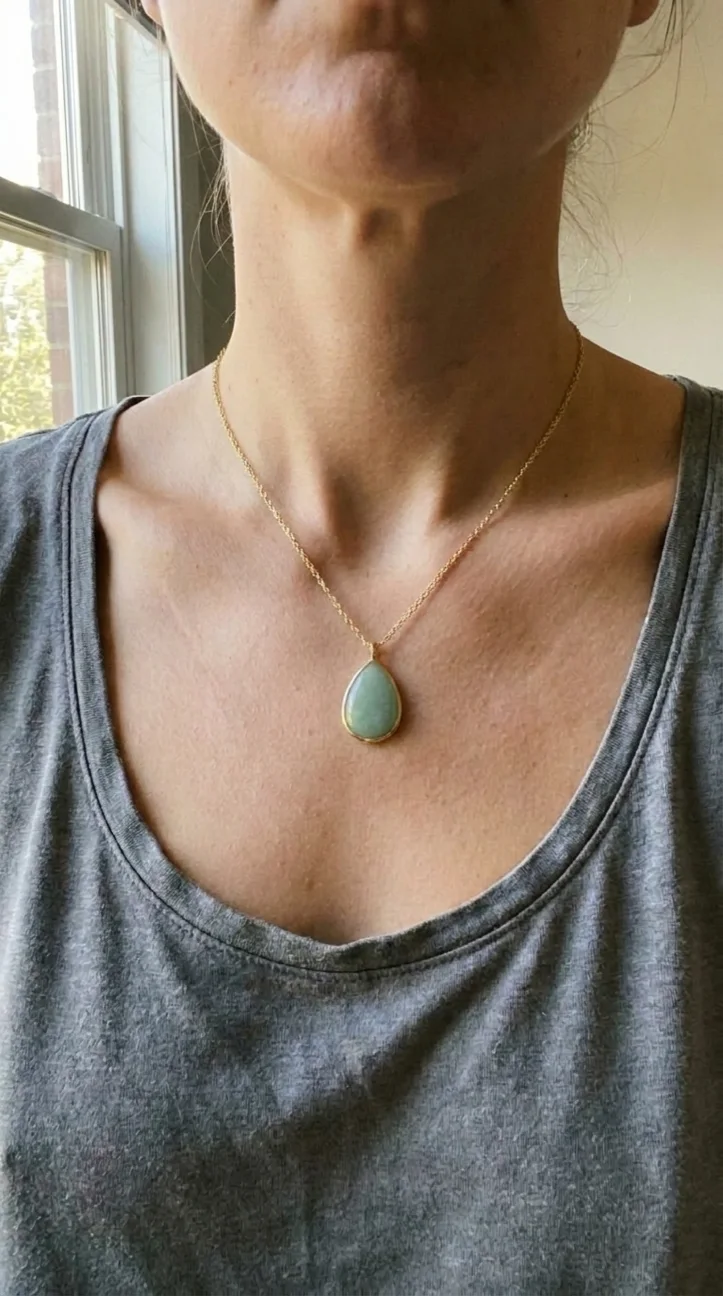
Both are AI generated, both are labelled as such here, and both were checked before use. That check is the whole discipline of this route, and jewellery is where it matters most, because the things that drift are exactly the things a buyer is paying for.
What to check on every generated shot
No tool will tell you when an image has quietly stopped describing your product. The only defence is looking, at full size, at every image, before it goes near a buyer. For jewellery the list is short.
- The stone. Shape, cut and colour, held next to your product photo rather than next to the last generated image. A pear that has become an oval, or a sage green that has become jade, is a different product.
- The metal colour. Warm scene light pulls yellow gold towards brass and rose gold towards copper. Compare against the flat shot, not against the room.
- The chain. Link shape and thickness, and whether it has quietly gained or lost length. A cable chain that has become a rope chain is not your chain.
- The clasp and the findings. Clasps are small and easy for a generator to invent. So are ear posts and backs.
- The scale. A pendant grown to twice its size against a collarbone is the most damaging failure here, because size is what the picture is supposed to be proving.
- Any text or marks. Never let a generated image carry an invented hallmark, karat stamp or maker's mark. If one appears, discard it.
- The edges. The area around the piece gets repainted along with it, so look at fingers, nails, skin and fabric as carefully as at the piece.
If something is wrong, the answer is to generate another one, not to publish it and hope. Nobody is grading you on the first attempt.
Video: making a piece sparkle
Stills cannot show what a stone does when it moves, which is most of why anyone wants it. Video is also where competition is thinnest for jewellery, because most shops never try.
- Move the light, not the camera. Fix the phone and turn the piece slowly. The flash across a facet is the shot.
- One hard light plus one soft. A small bright source makes the highlight, a soft one keeps the rest of the piece from going black. A window and a phone torch will do it.
- Go slower than feels right, a quarter turn over three seconds. Fast rotation reads as blur.
- Short and vertical: six to fifteen seconds, 9:16, the piece filling most of the frame.
- Do not add sparkle in the edit. Overlay glints look added, and an effect that makes a stone livelier than it is misrepresents the product.
The same clip covers Reels, TikTok and Shorts. There is a broader take on turning product photos into video in creating product videos for social media.
What you must never do to a jewelry photo
Editing a jewellery image is not like editing a landscape: the picture is a claim about a product, and in this category the claims are regulated.
The clearest rule is about size. Jewellery advertising guidance in the United States says outright that depicting a stone larger than its actual size may mislead unless the true size is disclosed, and that applies to a macro crop, a mockup and a generated image alike. The same rules cover cut, colour, quality and treatment, and they are explicit that depictions, illustrations and computer images count, not just sentences.
Three practical consequences:
- Do not saturate a stone. Pushing a pale aquamarine to a deep blue is a misdescription, not a filter.
- Do not brighten silver into rhodium. If a piece is not plated, do not photograph it as though it is.
- Do not retouch away what you sell. Smoothing a hammered texture or cleaning up an inclusion produces an image of a product you do not stock.
And the point that catches people out about AI specifically: labelling does not fix a misleading picture. UK advertising guidance has said plainly that you cannot rely on an "AI generated" note to rebut a misleading impression, and that the advertiser is responsible for whatever the tool produces. Disclosure is a separate duty, worth doing where a platform asks for it, TikTok being the strict one, but it is not a licence.
Where Yoomru fits
Full disclosure: Yoomru is our app. It is a Shopify app that posts your products to social media and generates the media to post, and one of the things it generates is a worn shot.
There are three jewellery scenes: a hand detail, a getting-ready mirror and a neckline close-up. You pick a product, and your piece is placed on the person in the scene. Both generated images above came from that pipeline.
The app asks for the right input rather than hoping for it. Each scene says what kind of photo it needs, right under its name, and for jewellery that is the piece straight on, on a plain background:
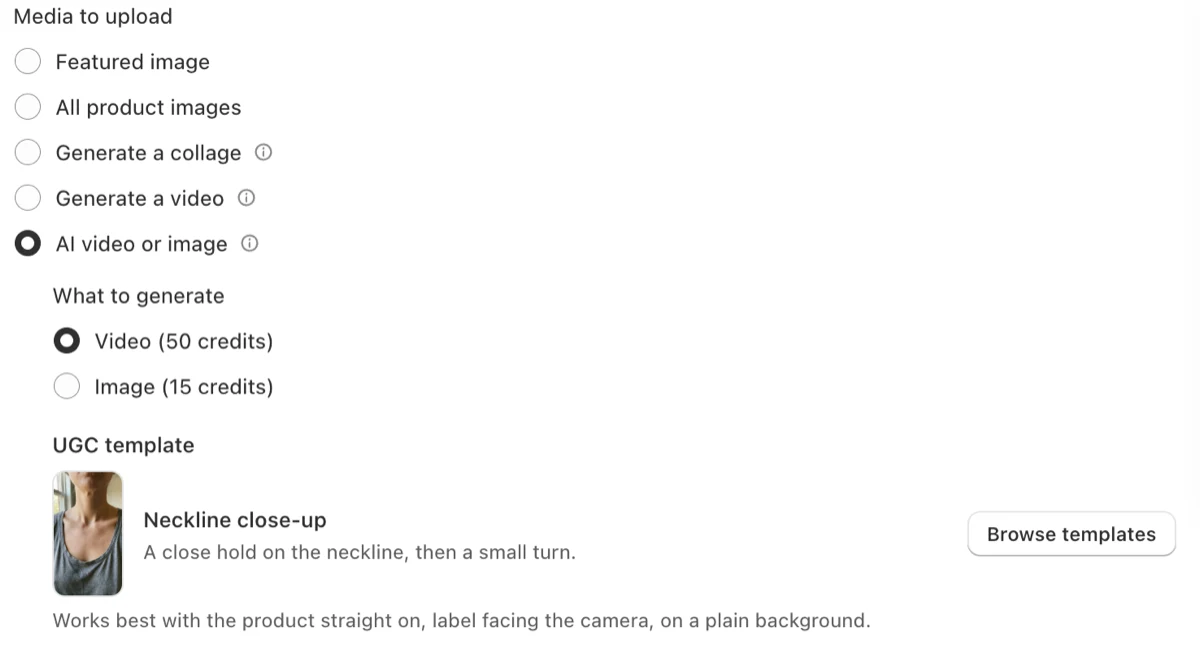
Each scene makes either a still or a five second clip. The still costs 15 AI credits, the clip 50, out of a monthly allowance that also pays for AI captions at one credit each: 50 on Free, 250 on Starter, 700 on Growth, 1,500 on Pro. In the composer a clip runs in two steps on purpose: the still is made first, so you can look at it and decide whether your piece survived, and only then does it get animated. Retrying the still costs nothing extra. Posts carrying an AI clip get a "Created with AI" line in the caption by default, which you can reword or switch off.
Three honest limits, since this post has spent so long on why checking matters:
- Three scenes is three scenes. We authored them once, so every shop using the jewellery category gets the same person. They supplement your photography rather than replace it.
- It costs credits, so it suits new pieces and best sellers rather than a catalogue of a thousand SKUs.
- You still have to look at every image. A stone that came out the wrong green will not be flagged by anything: that call is yours, every time.
The free plan publishes real posts rather than previews, and the feature documentation is at yoomru.com/documentations.
Before you publish a jewelry photo
- The piece in the image is the piece you sell: stone, cut, colour, metal, chain, findings.
- There is at least one image in the set that makes the size unarguable.
- The metal colour matches the piece in your hand, not the piece in your memory.
- Nothing has been saturated, brightened or smoothed into a product you do not stock.
- No invented hallmark, stamp or maker's mark appears anywhere in the frame.
- Anything generated is labelled where the platform asks for it.
- You cut the 9:16, the 4:5 and the 2:3 while you were there.
FAQ
How do you photograph jewelry at home?
Soft daylight from a window, white paper curved up the wall as a background, a second sheet held on the shadow side as a reflector, the phone resting on something so it cannot shake, and the piece held by putty or a pin rather than fingers. Get the colour right against the physical piece first.
How do I take pictures of jewelry with my phone?
Tap to lock focus and exposure, back off and crop in rather than shoving the lens as close as it will go, turn portrait mode off, and shoot slightly dark rather than slightly bright. Macro mode is for the detail shot, not the main one.
How do I make jewelry sparkle in a video?
Fix the camera and move either the piece or the light, slowly. Sparkle comes from a small bright source producing a highlight while a soft source keeps the rest of the piece from going black, so a window plus a phone torch is a working two-light setup. Do not add glints in the edit; they look added, and they overstate the stone.
Can I use AI models to show my jewelry?
In most places, yes, with conditions. Label it where the platform requires it, TikTok being the strict one, and never let the image misdescribe the piece: the stone, the metal colour and above all the size have to be true. A label does not rescue a misleading picture, and in jewellery a misleading picture comes back as a return.
Where do these images go once I have them?
Instagram first, then Pinterest. The channel-by-channel answer is in social media marketing for jewelry businesses, and the channel that keeps finding them for months has its own guide in Pinterest for jewelry businesses.